WorkflowsNEW
Workflow Editor (Canvas)
Build the graph on the canvas, use the sidebar, save often, and keep the layout readable.
The screenshot below shows the graph editor: the component sidebar (Core nodes, schedulers, resources, workflow parameters), the central canvas with nodes and edges, the active session bar (Show Session / Clear Session), and actions such as Run Test and Save Workflow.
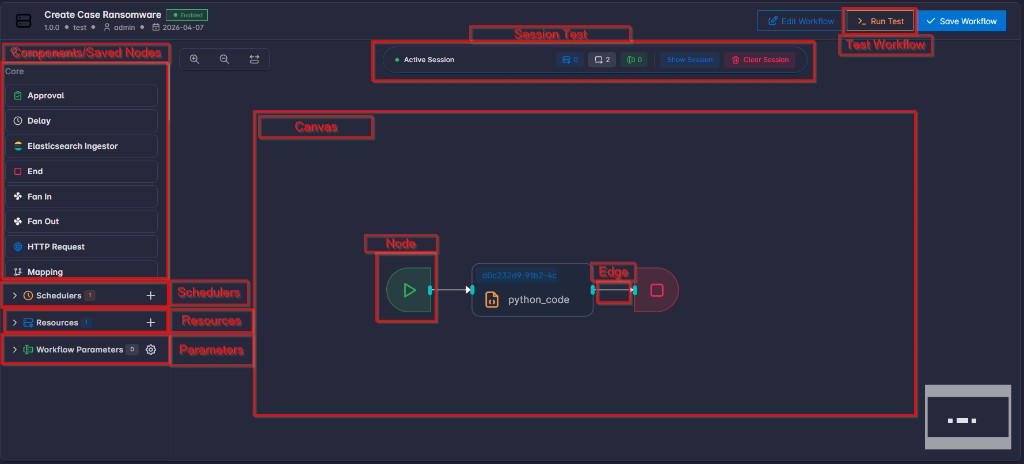
On the canvas you can:
- Drag node types from the sidebar onto the canvas.
- Connect nodes by drawing edges between handles (outputs to inputs, as shown for each node type).
- Select a node to edit its name, settings, and any links to resources.
- Zoom and pan to work on large graphs.
- Save often so your layout and configuration are kept.
Sidebar Components
| Sidebar component | What it is | How you use it |
|---|---|---|
| Built-in components (Core categories) | Standard node types provided by the platform (for example Start, End, HTTP Request, Approval, Transform). | Drag a node type onto the canvas, then select the node to configure its fields. |
| Saved nodes | Reusable node templates your team saved to the library. | Drag into the canvas to reuse approved patterns without rebuilding configuration from scratch. |
| Schedulers | Periodicly run the workflow based on configured time-frame | Open or add schedules that run this workflow automatically at a recurring interval. |
| Resources | Workflow-level shared connections and storage settings. | Create or edit resource entries, then reference them from node settings by resource id. |
| Workflow Parameters | Input schema for Run / Run Test dialogs. | Add or edit fields that users must fill when starting the workflow. |
Layout tips: Prefer a clear left-to-right flow, reduce crossing lines where you can, and save after bigger changes—especially before running a test.
Recommended Build Order
- Start with a minimal path (for example: Start → one main action → End).
- Save, then use Run Test to confirm the basics.
- Add branches (routers, conditions) and parallel paths if needed.
- Add integrations and resources once the structure is stable.
- Add a scheduler only after manual and test runs succeed reliably.
Good habits: Use clear node names, one main purpose per node where possible, and approval steps for sensitive actions.